


The Tecnis Symfony (Abbott Medical Optics) is a relatively new addition to the armamentarium of IOLs offering solutions to presbyopia. The Symfony provides an extended range of vision through the incorporation of a diffractive echelette optical design, rather that splitting light like a multifocal IOL. At the same time, its achromatic technology corrects for chromatic aberration, providing improved contrast sensitivity.
AT A GLANCE
• Premium lenses require a consistent workup and attention to detail when centering the lens to achieve the greatest outcomes.
• Maintaining IOL centration is contingent upon using the correct technique and tools to keep it where you want it.
• Performing capsule capture can help one to ensure that the lens stays in place on the line of sight.
Like any premium IOL, the best visual results with the Symfony depend on accurate centration. For surgeons who are not familiar with implanting the Symfony, I humbly offer nine clinical pearls for centering this high-technology lens (http://bit.ly/baldassare916). But these pearls start well before you and the patient enter the operating room. They require a careful rethinking of your way of managing patients.
CHOICE PEARLS
 Develop a protocol for the process. Following a systematic approach is the cornerstone for success. For premium lenses to be successful, every step of the surgery must be performed the same way, for every patient and for every procedure. This does not necessarily translate to additional chair or staff time; it simply requires an up-front commitment to organize your office and thought process to smoothly proceed through each step of your protocol.
 Select the right patient. Achieving proper lens centration requires an appropriate eye. I carefully screen my patients and apply elimination criteria to screen out those at risk of experiencing aberrations and poor visual quality postoperatively. In my experience, patients with healthy eyes, an angle kappa of less than 0.5 mm, root mean square (RMS) higher-order aberrations of less than 0.3 µm, and no unique corneal abnormalities generally make good candidates for premium IOLs.
 Measure, then measure again. We have happy patients because we use good data, not because we do something special or unique during surgery. We perform Pentacam (Oculus), OPD-Scan III (Nidek), and wavefront analyses to determine the eye’s astigmatism and the optical quality of the cornea. We use IOLMaster (Carl Zeiss Meditec) measurements and the Holladay 2 formula to calculate lens power. Then we repeat these measurements in every patient—two or three times—to ensure that the results are consistent. Although the initial measurements may appear valid, they can be inaccurate if readings are taken on a day when the patient has a dry eye or if the technician’s measurements were not completely reliable. Accurate, precise metrics are nonnegotiable.
Do not worry that multiple measurements may be an inconvenience to your patient. Our patients are usually happy to return to our office for a 5-minute repeat measurement. They understand that it is in their best interest that we start with correct data.
 Capsule-capture it. Every IOL has pros and cons. The Tecnis Symfony lens is slick and, therefore, easier to center than its stickier counterparts. However, maintaining centration is contingent upon using the correct technique and tools to keep it where you want it. IOLs are just like golf clubs; a 3 iron and a wedge are both good clubs, but they must be used differently. For Tecnis lenses, implantation and centration are technique-dependent.
Following is my preferred technique to center the Tecnis Symfony lens:
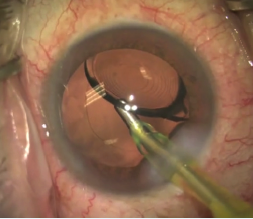
Figure 1. OVD is removed from behind the IOL.
Step No. 1: Remove OVD. Once the crystalline lens is removed and the Tecnis Symfony is implanted within the capsular bag, I remove all of the cohesive OVD, especially from behind the lens implant (Figure 1). I avoid use of dispersive OVDs, as there is more risk of retaining residual OVD under the lens, preventing adhesion.

Figure 2. Pushing down on the Symfony aids in capsule capture.
Step No. 2: Lock the lens into place. I place the lens on the axis of what I believe is the patient’s line of sight. I then push down on the lens with the I/A tip with almost maximal irrigation and aspiration engaged. The elasticity of the capsular bag allows it to stretch over the edges of the haptic and optic. Then, as the pressure is slowly released, the lens is encapsulated in the bag, thus locking the lens in place and reducing the risk of further movement or rotation. I term this the capsule capture of the lens (Figure 2).
Just as with any multifocal or toric lens, secure and correct positioning is crucial when implanting the Tecnis Symfony. Any rotation or shift can produce substandard outcomes. If a lens does spin after implantation, it can be capsule-captured in the capsular bag by applying pressure with a 27-gauge cannula via the paracentesis, as described below.
 Understand your microscope. To correctly verify axis centration, your microscope should be equipped with a coaxial beam. Most modern microscopes have this, but, if yours does not, invest in an adapter that can give you a coaxial fixation point.
Remember that the pupil is a dynamic entity; pupillary centration does not necessarily equate to a properly centered lens, and further verification is required. After hydrating the wounds, I dim the lights in the operating room to ensure that the patient fixates on the correct light point. To ensure correct fixation, I block one of the two coaxial beams on the microscope with my finger so that the patient fixates on a single coaxial beam.
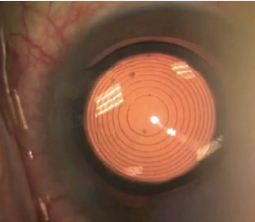
Figure 3. The first Purkinje references the patient’s line of sight and shows the patient’s angle kappa.
 Trust the Purkinje image. The first Purkinje image of the cornea while the patient is fixating on the single coaxial beam references the patient’s line of sight and shows us the patient’s angle kappa (Figure 3). If the angle kappa is less than 300 µm and the first Purkinje image is in the center of the first diffractive ring of the Tecnis Symfony, the lens is well centered and no adjustment is necessary. An angle kappa of greater than 300 µm requires an adjustment of the lens position, typically half the distance of the angle kappa. For instance, if the angle kappa is 450 µm, offset the Purkinje image approximately 225 µm nasally. In general, it is better if the first Purkinje image is slightly nasal to the lens center rather than temporal. For any angle kappa of 300 µm or less, I center the lens directly on the first Purkinje image.
 A self-centering lens does not guarantee centration. Despite the self-centering design of the haptics, a lens may be difficult to center, and it may decenter, move, or rotate after implantation due to an asymmetric or small capsular bag. This is particularly true in small eyes with small capsular bags. A capsular bag that is oval-shaped may cause the lens to sit in a slightly different location after rotation. During the centering process, the lens may center quite nicely with the haptics in one particular position, but not in another. The converse is also true; if the bag exceeds the diameter of the haptics, you may see the lens move back and forth because its diameter is not great enough to fully bridge the entire capsular bag. In this event, it must be capsule-captured in order to be fixed into position. I recommend capsule capturing to ensure that the lens stays in place on the line of sight.
Moving a capsule-captured lens, should the initial position not be ideal, requires a modification of the capsule-capture technique. I typically enter through the paracentesis with an irrigating 27-gauge cannula to avoid collapsing the anterior chamber. I inject balanced saline solution to inflate the anterior chamber and uncapture the lens by deepening and stretching the bag away from the lens. I then rotate the lens into the desired position and again irrigate as I push down on the lens, capsule-capturing it. Once the lens is in place, I irrigate a little bit more and then use a 27-gauge cannula to hydrate the paracentesis and secure the wounds. I gently release and remove the cannula to lock the lens in place.
This is essentially the same as the technique described earlier with the I/A tip, except this is done through the paracentesis with the cannula. The 27-gauge cannula offers better control for this maneuver than the I/A tip, which can leave a bit of an open wound. This could potentially cause the chamber to collapse, even with a 2.2- or 2.4-mm incision. Entering through the paracentesis reduces the risk of collapse and works just as well to produce the desired visual quality and acuities our patients expect.
We have performed more than 50 cases using this Purkinje image–guided posterior pressure capsule-capture technique. Our data indicate an increase in the number of patients achieving good functional vision and better near vision, as demonstrated by the ability of most patients to read 20/25 with good reading speeds after bilateral Tecnis Symfony implantation.
 Some data are better obtained the old-fashioned way. When choosing the lens power, I generally target -0.25 to -0.50 D. My cutoff is -0.75 D because patients who are left more myopic than this will not have acceptable distance vision. In my experience, the Symfony lens is more forgiving than a multifocal lens, and patients seem to see better than expected given their refractions and, especially, their levels of residual astigmatism. I perform the manifest refraction myself, especially on the first eye, for use in planning for the second eye. Autorefraction is unrealiable, and manifest refraction is a must to determine the refraction.
 Realize that this is not a perfect science. Technology requires oversight; it is not perfect yet. We can certainly use technology and objective measurements in preoperative planning, but these are never a guarantee of perfection. However, we can determine the lens centration after surgery as validation of our surgical technique. If possible, check the lens centration using the first Purkinje image. The OPD-Scan III has an image that can mark the line of sight using a red reflex image of the concentric diffractive rings of the lens. Confirming correct centration is a necessary step to ensuring the best outcomes for your patients.
Conclusion
Accept that, at times, a lens will simply not center perfectly, but know that employing the nine techniques described above will give your patients the greatest chance of excellent quality vision at all distances with the least risk of dysphotopsia from a poorly centered lens. Premium lenses with premium outcomes require a consistent workup and attention to detail when centering the lens to achieve the greatest outcomes for your patients.
Ron Baldassare, MD, CM, FRCSC, ABO
• Cornea Specialist and Clinical Researcher, Vivid Laser Centre, Kelowna, British Columbia, Canada
• ronbaldassare@me.com
• Financial disclosure: Consultant (Abbott Medical Optics)