
Sponsored by
Oertli Instrumente AG, Switzerland
I am told that I was one of the first surgeons in the United Kingdom to adopt microincision cataract surgery (MICS), a technique introduced around 2002 that aimed to reduce surgical invasiveness and to improve postoperative outcomes. Since introducing MICS to my practice, I have completed more than 8,000 sub-2 mm procedures, and today I perform all procedures with the CataRhex 3 phaco machine (Oertli Instrumente; Figure 1).
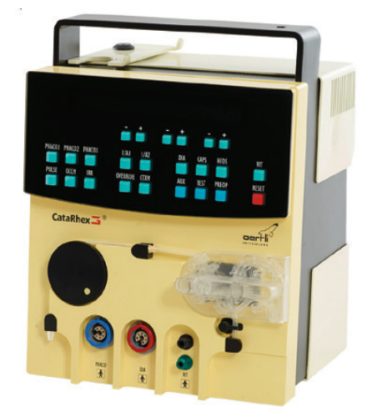
Figure 1. The CataRhex 3, a portable and powerful phaco machine.
During MICS, I prefer to implant a plate-haptic IOL designed by Carl Zeiss Meditec (CT Asphina 509MP) because it passes easily through an incision of less than 2 mm. In patients with more than 0.80 D of keratometric cylinder, I implant a toric lens, which is included in the basic price of surgery. There are no exclusions to the procedure.
SURGICAL TECHNIQUE
In most of my patients, I perform immediate sequential bilateral cataract surgery, meaning that I do both eyes on the same day. I use the toric planner of the iTrace Wavefront Analyzer (Tracey Technology) to locate the steep axis and then enter the eye via a scleral tunnel. The CataRhex 3 machine can be used with clear and near-clear corneal approaches just as easily, but I personally use the scleral tunnel because I find it more secure. I also find that there is no possibility of inducing astigmatism with a scleral tunnel, and the risk of endophthalmitis in the postoperative period is markedly reduced.
To open the capsule, I prefer a needle rhexis. Alternatively, one can use special forceps like the 23-gauge Micro Capsulorhexis Forceps with a 15-mm curved shaft from Optico. Conventional forceps, however, are not compatible with MICS as the incision is too small to allow the forceps to open. A great advantage of the CataRhex 3 for cataract surgery is that I can use the Klöti capsulotomy tip (Oertli; Figure 2). This tip supports the capsulorrhexis in every case and is especially useful in patients with white or dense black cataracts.
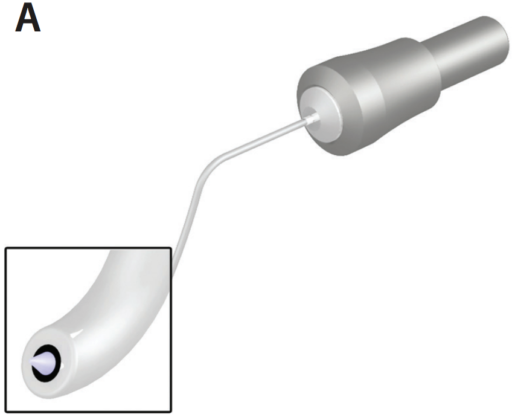
Figure 2. Capsulotomy tip of the CataRhex 3 (A). The Kloti probe in action (B).
Radio waves heat the probe enough to melt the capsule; the probe is then used to trace a circle for capsulotomy in instances in which a needle or forceps may not be used safely. It is simple, and the radiofrequency probe melts the capsule in any reference size and in any shape. One tip is to go slowly so that the probe has enough time to melt the capsule in a 360° continuous curve. Once the capsule is opened, I first move the free capsule into the center of the anterior chamber to ensure that it is completely free. I then use the cortical cleaving hydrodissection technique first described by I. Howard Fine, MD, to mobilize the nucleus.
STRAIGHT TO THE CAPSULOTOMY TIP
The ability to use the Klöti capsulotomy tip is one of my favorite aspects of the CataRhex 3. I find that it has become essential in my practice, as I see a lot of patients with white or dense black cataracts. With this capsulotomoy tip, I no longer use dyes to visualize the capsule—I just go straight to the capsulotomy tip.
One common concern is that a capsulorrhexis created in this manner might not be as strong as one created manually, by a femtosecond laser, or by other devices like the Zepto (Mynosys), but I disagree. The capsule behaves almost like a conventionally torn or femtosecond capsulotomy, and, in my hands, it is secure and withstands all the normal manipulations (Figure 3).
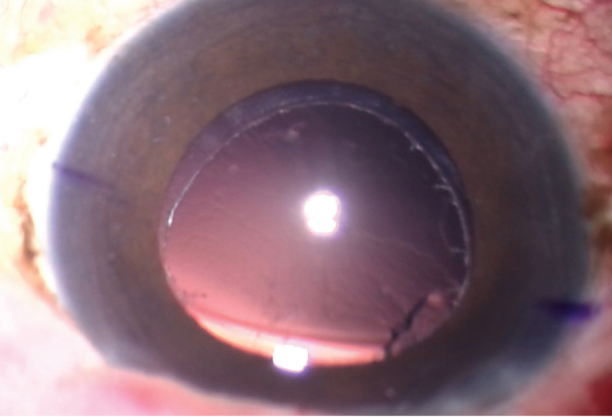
Figure 3. The cut edge of the rhexis is seen after the cataract has been removed.
When using the CataRhex 3, I start with conservative settings (very low flow and no occlusion), and I shave off the anterior cortex, thereby creating more space to work on the lens. During lens removal, I first make a groove at 100% depth—so that the posterior capsule is visible at the bottom of the groove— and then I unlock and chop the lens. The fragmented material is then removed by switching to very high flow and vacuum to maintain the stability of the anterior chamber. To clean the capsule of cortical remnants, I perform turbo polishing by using a hydrodissector to irrigate the areas where any remnants are dislodged.
CONTROLLING VACUUM
Another great advantage of the CataRhex 3 is a function called CortexMode, which changes the way the pump system works (Figure 4). Instead of a conventional peristaltic pump that increases the flow rate as the footpedal is pressed, pressing the footpedal increases the vacuum. Additionally, a constant flow rate can be set on the machine.

Figure 4. Pump behavior in free flow (left column) and under occlusion (right column).
In my experience, the ability to directly control vacuum with the footpedal makes a significant difference in postoperative outcomes. After peeling any plaque that may have formed, I finish by placing the IOL into the capsular bag, positioning it appropriately, and then performing irrigation and aspiration to remove the OVD. There is a little bit of work involved in my technique, but it is handy, and the anterior chamber stays nicely stable.


