


In 2005, while working in Pakistan, I met a patient with posterior lens capsule opacification who complained of hazy vision years after cataract/IOL surgery. I performed Nd:YAG laser capsulotomy, and the patient experienced immediate improvement in visual function. A week later, however, he returned and said that, while I’d solved one problem for him, I’d created another: He was now experiencing eye floaters that were causing difficulty in driving.
At first, I didn’t know how to help him, but I started to consider the possibility of using laser vitreolysis to eliminate the fragments of posterior lens capsule in the anterior vitreous. In this procedure, a 3-ns laser pulse is focused on an 8-μm spot on the floater. The laser causes optical breakdown of the vitreous opacity into plasma, which appears as a gas bubble and is absorbed in 10 to 30 minutes.
My patient agreed to give it a try, and, to my surprise, 70% of his problem was resolved in just one session. I repeated the treatment 3 weeks later, and both the patient and I were satisfied with the results.
The journey that started with a single case has continued, and I now wish to share my experience with this high-reward and low-risk technique.

Choosing the best candidates is the key to overall success
The success of any procedure is measured by patient satisfaction. For the best results, the surgeon must know which patients are most likely to benefit from laser vitreolysis and set realistic expectations for those patients. One must consider the limits of his or her surgical skill and expertise, as well as the available laser technology.
A patient with a vitreous opacity such as a Weiss ring (Figure 1), onto which you can sharply focus the laser beam, is an ideal candidate, provided the optical media are clear. It is best to ensure that the vitreous opacity is away from the retina and the posterior lens capsule in phakic eyes to avoid damage to these important ocular structures.
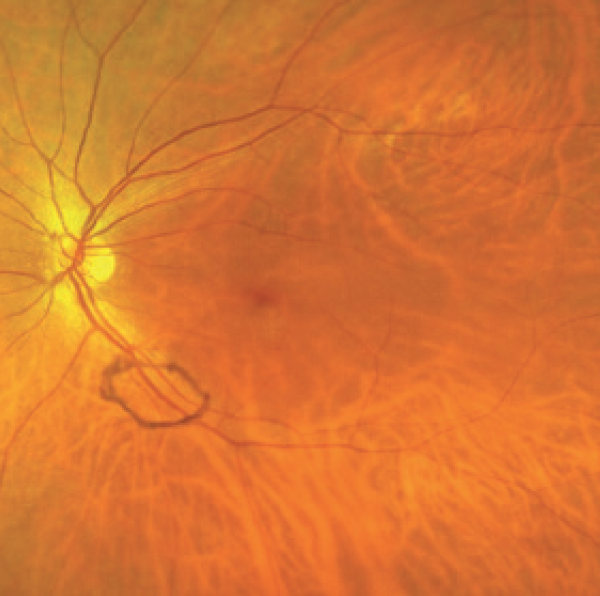
Courtesy of Karl Brasse, MD, MRCOphth
Figure 1. Presence of a Weiss ring in the vitreous.
It is also best to avoid patients with multifocal IOLs or with any media opacity, uncontrolled glaucoma, active anterior or posterior segment inflammation, active or healed retinal necrosis, untreated retinal detachment predisposing to degeneration, or active cystoid macula edema.

Prepare for the procedure
Dilate the pupil. Laser vitreolysis requires a fully dilated pupil. I usually instill one drop of 2.5% phenylephrine followed by a drop of 1% tropicamide 5 minutes later, and I advise the patient to sit in the waiting room with gently closed eyelids. The pupil usually fully dilates in about 20 to 30 minutes.
Position the patient. The patient must be able to sit comfortably to undergo this procedure, as it is a high-tech, professionally demanding procedure in which complete cooperation is needed from the patient to avoid complications and an unsatisfactory outcome. Once the patient is about to sit for the procedure, I instill a drop of topical anesthetic. After 3 minutes, I proceed to the next step.
Apply the vitreolysis lens. Ensure that the lens is optically clear, clean, and free from debris or dust. Use a dispersive, clear viscoelastic gel. Ensure that there are no air bubbles in the gel in the cup of the vitreolysis lens. Start filling the cup from the base to prevent air bubbles in the viscoelastic gel. Fill about half the cup to avoid spilling the viscous solution onto the patient’s cheek during lens application. Ask the patient to gently look up, retract his or her lower eyelid with your left index finger, and apply the vitreolysis lens with your right hand while asking the patient to look straight ahead. Then gently release the eyelid and proceed to the next step.
Find the vitreous opacity. It is important to have a clear view of the vitreous opacity causing the floater and to achieve a sharp focus of the laser aiming beam on the vitreous opacity. Scan the vitreous with 8X magnification on the slit lamp. Gradually move from anterior to posterior, then from left to right, then from top to bottom. Rescan if needed.
Once you find the vitreous opacity, coordinate it with the floater chart that you made when you performed the initial evaluation. (See My Toolbox.) You may need to ask the patient to look in the required position of gaze, and in some cases you may need to use a contrast filter.
Adjust the laser parameters. The laser power should be set according to the size, shape, location, and density of the vitreous opacity. I usually start with power of 2.5 to 5 mJ, depending upon the location and density of the opacity. It is better to start with a low power and work up according to the response of the opacity in terms of optical breakdown and vaporization.
Adjust the slit-lamp parameters. Begin with minimal magnification, as this allows scanning of a large area of the vitreous. Increase the illumination gradually to the required level. Once you locate the vitreous opacity that is causing the floater, you can proceed to 8X magnification to examine the vitreous opacity and to plan where and with what approach to apply the laser. If needed, you can increase to 12X magnification.
Switch on the the laser, but keep it at minimum power. Increase the intensity of the laser aiming beam to the maximum required and see if you can accurately and sharply focus the beam on the vitreous opacity without any astigmatic points in focusing. Use the laser offset as needed.
MANAGE EXPECTATIONS
Before you begin, ensure that the patient understands that the aim of the procedure is to achieve symptomatic relief and functional improvement from the complaint of visually disturbing floaters. Set realistic expectations about the treatment and explain possible risks. Make the following points:
- This is a minimally invasive and painless procedure that takes between 15 and 60 minutes. The patient will see the flash of the laser and hear sounds.
- Patient cooperation is important to increasing success and minimizing risk of complications. The patient should not move his or her eye, head, face, or body during the laser treatment and must not squeeze the eyelids.
- The patient may see dark specks due to gas bubbles for 15 to 30 minutes after the treatment.
- Once a floater is treated, it will never come back, but new floaters can appear as part of the degeneration of the vitreous.

Perform the procedure
Direct laser shooting. After locating the vitreous opacity, shoot the laser with a stable hand without any movement of the patient’s face, eye, or head or of the slit-lamp laser-delivery system. Treat anteriorly located vitreous opacities first. Similarly, treat superiorly located vitreous opacities first.
It is important not to shoot the laser when a retinal blood vessel, the macula, or the optic disc is in the immediate background of the line of treatment of the opacity (Figure 2). Ensure that the laser-aiming beam is clearly focused on the vitreous opacity; there is no margin for error in focusing on it, and the offset must be used as needed with proper positioning of the slit-lamp illumination arm. Shoot the laser when you are focused on the floater with 100% precision.
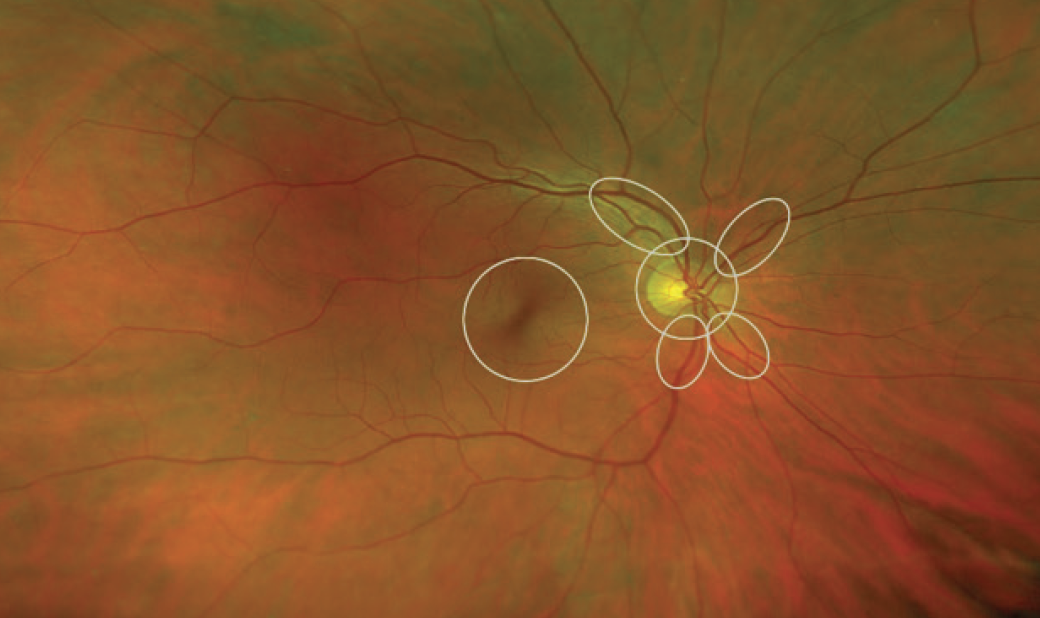
Courtesy of Karl Brasse, MD, MRCOphth
Figure 2. Do not shoot the laser if it is in line with macula, blood vessels, or the optic disc.
Use a side tilt and retroillumination laser-shooting technique when necessary. Sometimes it is not possible to shoot the laser directly at the vitreous opacity with coaxial illumination. In this case, tilt the illumination column to the right or left side of the slit-lamp viewing system. Focus the laser-aiming beam on the vitreous opacity and, once a sharp focus is achieved, shoot the laser.
After shooting the laser, observe the response: Plasma formation should appear like a gas bubble rising up, along with change in the location and density of the vitreous opacity. Observe the absorption of the laser energy and successful evaporation of the opacity.
Don’t exhaust the patient or yourself. Communicate with the patient during the procedure, explain what is going on, and address what the patient is feeling, if needed. After a laser shot, wait before the next shot so you can refocus on the vitreous opacity once it settles to a new position.
Do not shoot more than 500 single pulse laser shots or exceed 1,000 mJ of energy delivery in the eye in one session. Stop the treatment if you feel tired or the patient loses concentration and cooperation.

Evaluate the patient after the procedure
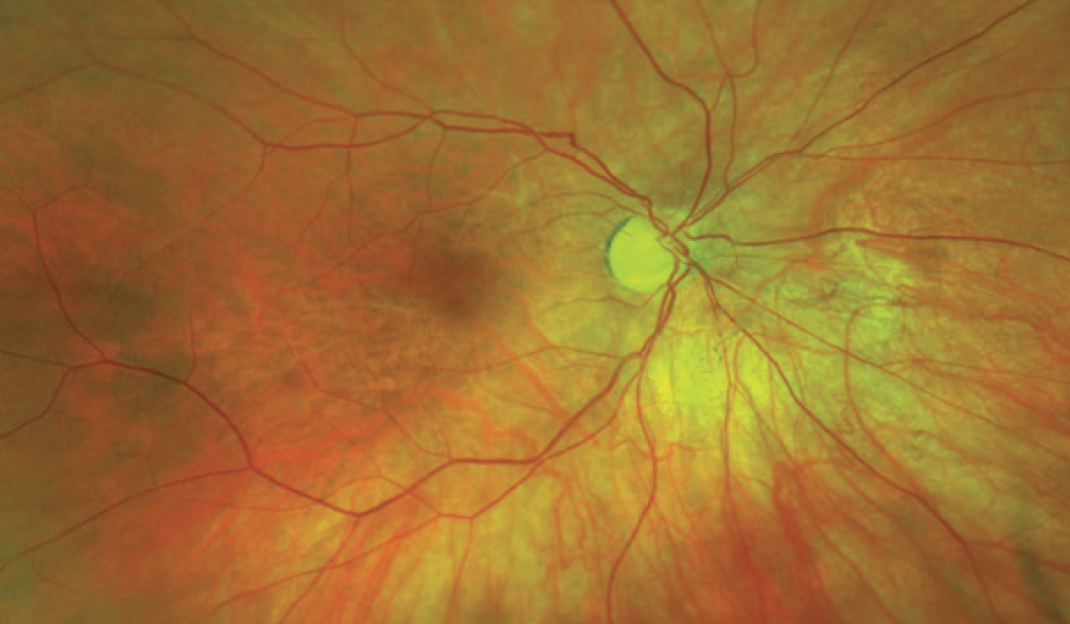
After treatment, I instill a topical antibiotic and lubricant eye drops and instruct the patient to sit with a gently closed eye in the waiting room. This helps him or her recover from the exposure to bright light during treatment. After 30 minutes, I use the floaterscope (see My Toolbox) to evaluate the floaters and compare before and after treatment (Figures 3 and 4). I measure and document IOP after 1 hour.
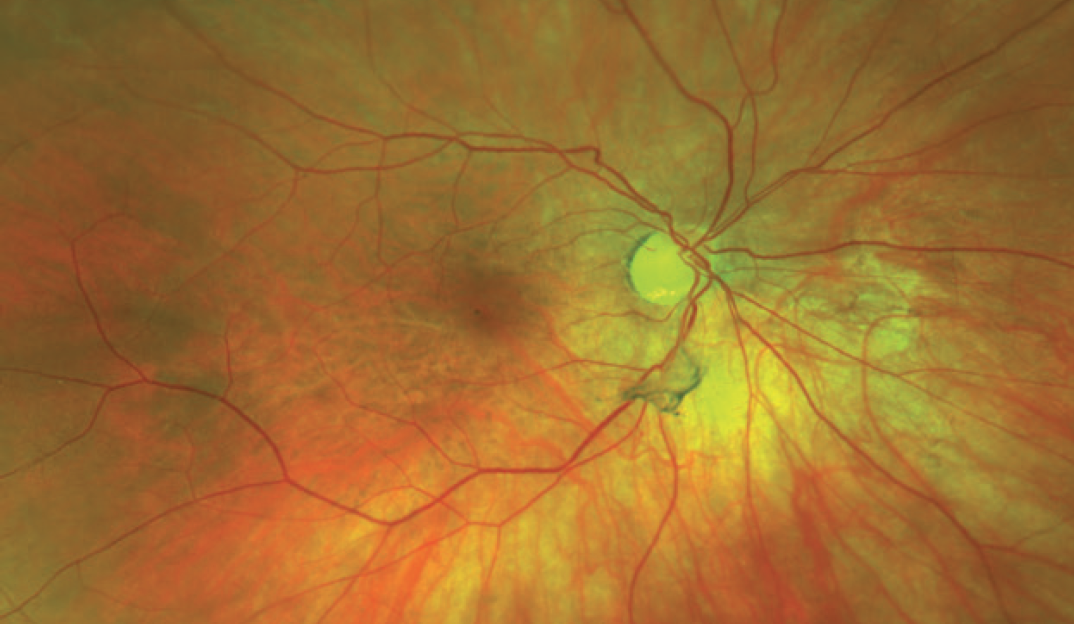
Figure 3. Vitreous opacity before laser treatment.
Courtesy of Karl Brasse, MD, MRCOphth
Figure 4. No vitreous opacity and no floater after laser vitreolysis.
Antibiotic eye drops are advised three times a day for 3 days or longer if there is a corneal abrasion due to the contact lens. IOP-lowering drops are advised if the IOP is expected to rise. I suggest use of an oral analgesic for 1 or 2 days if needed for headache. Topical steroid eye drops are advised three times a day for 5 to 7 days, as inflammation is a natural outcome of any trauma, although the procedure of laser delivery in the vitreous is minimally invasive.
My Toolbox
Idrees Floaterscope. The Idrees Floaterscope (Figure 5) is used to assess the size, shape, density, location, direction of movement, and final settling position of floaters.
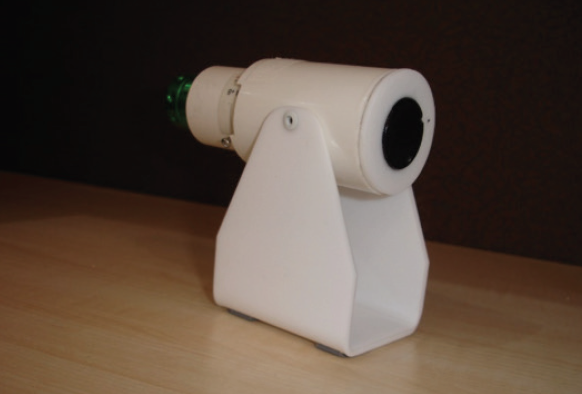
Figure 5. Idrees Floaterscope.
Floater chart. I use this chart to document information from the Floaterscope.
Nd:YAG. This laser technology must be optimized for safe use in the posterior segment.
Vitreolysis lens. I use the Volk Idrees MidVitreous Lens (Figure 6), which I designed (but in which I have no financial interest). It provides a clear, magnified view of vitreous opacities and makes it easy to see, focus, and shoot the laser at vitreous opacities without wasting misplaced laser energy. The vitreolysis lens must be maintained in clean and scratchless condition. A Volk LensPen can be used to clean it and ensure that the lens optics are free from dust, grease, smudges, or fingerprints.
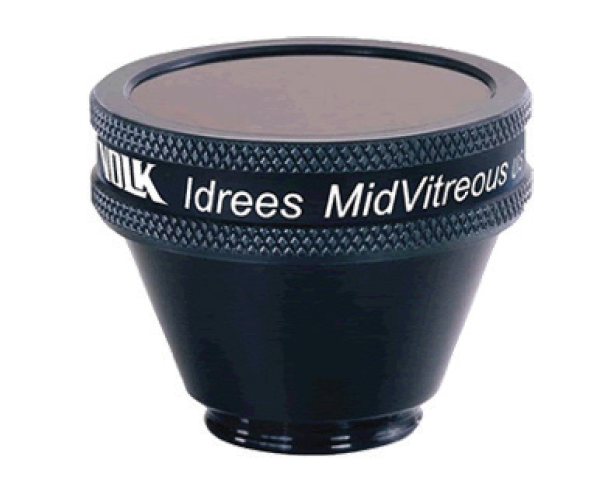
Figure 6. Volk Idress MidVitreous Lens.

Wait about 4 weeks before planning touchups or repeat treatment
After 2 days, I examine the patient, check visual acuity, perform a floaterscope evaluation, monitor IOP, and evaluate symptomatic improvement. I note the level of visual satisfaction and functional improvement in quality of life. I look for any retinal detachment, lens opacity, elevated IOP, or uveitis. I usually wait for 4 weeks before planning touchups or repeat treatment if needed.
Special thanks to Karl Brasse, MD, MRCOphth, for his review of the article, advice, and photographs.


