


Even the most skilled and experienced anterior segment surgeons dislike performing IOL exchange surgery. There is a risk that, in aiming for perfection, a good outcome can quickly become a complicated surgical scenario. The longer an IOL is in the capsule before exchange, the higher the likelihood of damage to the capsule and/or zonules. Several scenarios can lead to the need for an IOL exchange. Examples include an incorrect IOL power calculation that led to a residual refractive error, optical aberrations that interfere with a patient’s daily activities, lens subluxation or dislocation, IOL opacification, damage to the IOL or surrounding ocular tissue, and poor quality of vision or visual disturbances that cause patient dissatisfaction. I prefer the scaffold technique for IOL exchange because, in my hands, it is safer and more efficient than other techniques. Here and in the accompanying video (see video below), I present pearls for the scaffold technique.
THE TECHNIQUE
To begin, a sideport incision is created, the anterior chamber is filled with an OVD (Figure 1), and a main incision is created. One tip for the main incision is to try to find and open the original incision with a wriggle of the keratome (Figure 2), minimizing the creation of additional surgically induced astigmatism and potential for residual refractive error in the final result.
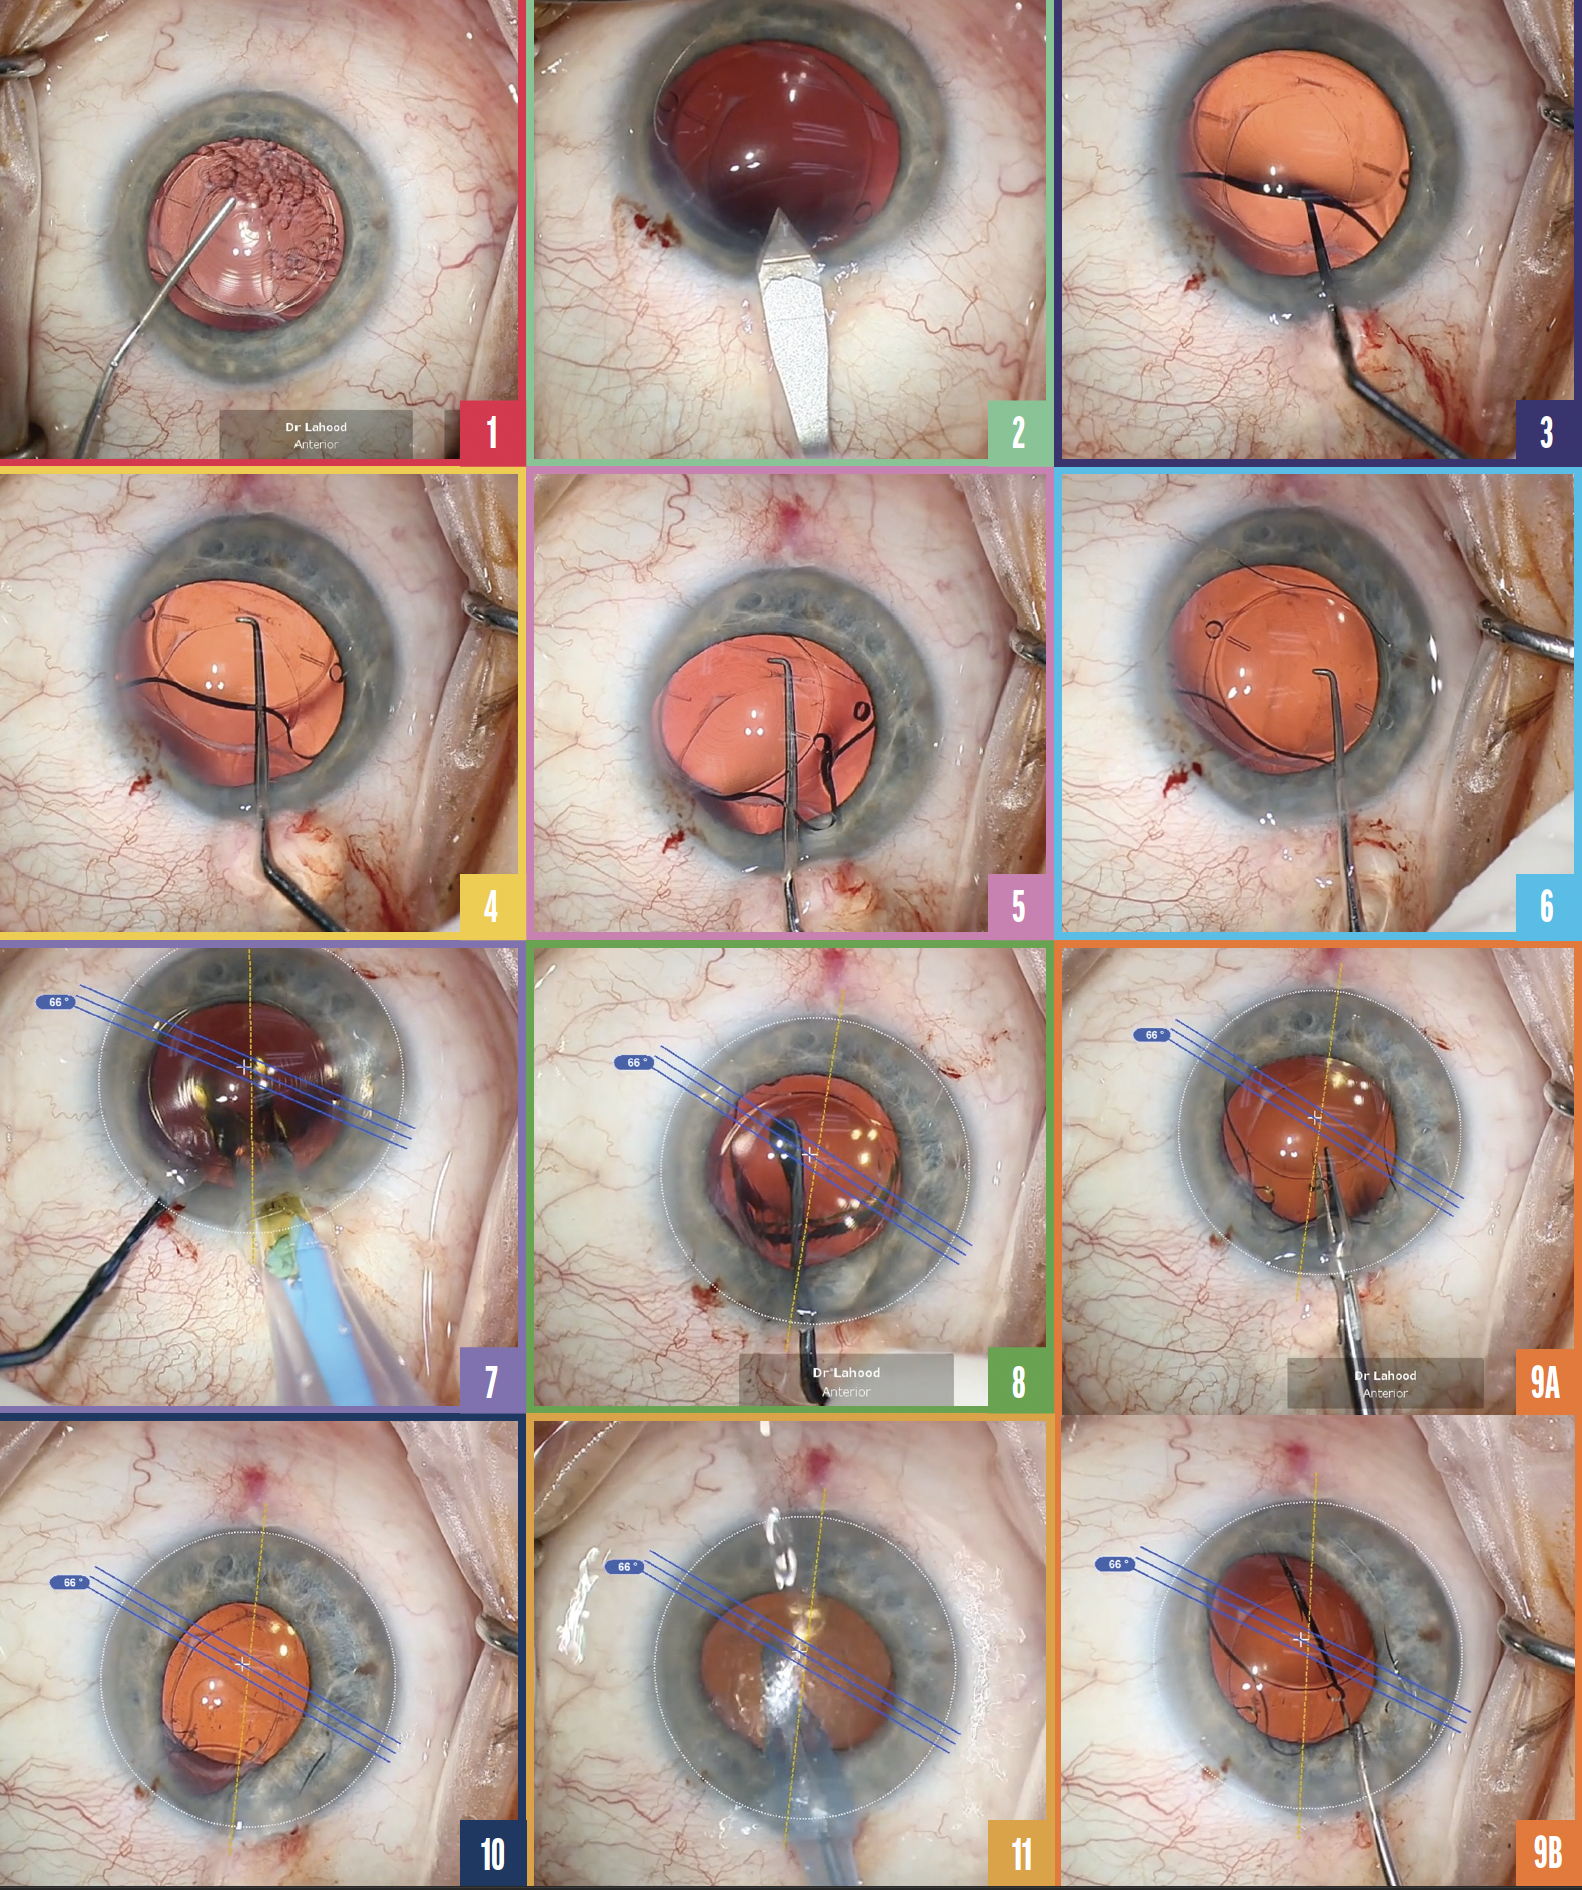
Figure 1. The anterior chamber is filled with an OVD.
Figure 2. A keratome is used to open the original incision.
Figure 3. The instrument is placed underneath the IOL.
Figure 4. The IOL is sandwiched forward into the anterior chamber.
Figure 5. The first haptic is drawn into the anterior chamber.
Figure 6. The IOL is subluxated in front of the capsule.
Figure 7. The new IOL is implanted underneath the original lens before the original lens is removed.
Figure 8. The toric IOL is dialed into position.
Figure 9. Small cuts are made in the original IOL lengthwise (A) until the entire length of the cut extends about 90% of the IOL’s length (B).
Figure 10. The IOL is rotated 180º to remove the second half.
Figure 11. The OVD is removed with irrigation and aspiration, and the position of the new IOL is confirmed.
The trickiest part of the operation is removing the original IOL from the capsule. In the case presented in the video, a hydrophilic lens is removed. Once an OVD has been used to cleave a space between the posterior capsule and IOL, it is safe to manipulate the lens. My second tip is to reach an instrument underneath the whole IOL (Figure 3) and sandwich it forward into the anterior chamber (Figure 4). It works best with this type of lens because it is fairly flexible. One of the plate haptics is drawn into the anterior chamber (Figure 5), and the whole IOL is then subluxated in front of the capsule (Figure 6). With a hydrophobic IOL, instead of sandwiching the IOL up and out of the capsule, the stiffer material can be rotated out, with care taken to rotate C-loop haptics clockwise.
The next step in most IOL exchange techniques is to explant the original lens. With the scaffold technique, however, the new IOL—a Clareon Toric monofocal hydrophobic IOL in this case (Alcon)—is first implanted underneath the original IOL in the capsular bag (Figure 7). The second IOL provides structural support and prevents damage from occurring to the capsule while the original IOL is cut.
For toric IOLs, I use Callisto eye (Carl Zeiss Meditec) to dial the lens into position on the correct axis (Figure 8).
My third tip applies whenever the astigmatic result was not the cause for the IOL exchange. In this situation, it is best to position the IOL in exactly the same spot as the original. If residual astigmatism was part of the reason for the IOL exchange, the most important piece of information required to plan the new IOL’s position is subjective refraction. The position of the new IOL protects the capsule, allowing the first IOL to be cut efficiently without fear that the scissors will rupture the posterior capsule. A series of short cuts in the original IOL are made lengthwise (Figure 9A). The entire cut should extend to about 90% of the IOL’s length (Figure 9B) so that it can be removed in one piece through a 2.2-mm incision by pulling it halfway out of the incision and then rotating it 180º to remove the second half (Figure 10). As before, the new IOL protects the capsule, this time from potential damage from movements of the original IOL during explantation. Maintaining a small incision for IOL removal minimizes the change in corneal shape.
At the end of the case, the OVD is removed with irrigation and aspiration (Figure 11), and the position of the new IOL is checked. Both the sideport and main incisions are hydrated, and antibiotics are injected.
CONCLUSION
The scaffold technique is a safe and efficient procedure for IOL exchange. Implanting the new lens into the capsule before explanting the original lens reduces the risk of accidental damage to the capsule.
